Introduction
When a walk-in freezer fails, the consequences hit fast and hard. Spoiled inventory can cost thousands of dollars within hours. Health code violations can shut down operations entirely, and lost revenue keeps compounding while you scramble for a fix. For restaurant owners, grocery stores, and commercial operators in Bryan, TX, ignoring early warning signs isn't just risky—it's financially devastating.
The good news: most walk-in freezer failures don't happen without warning. They follow predictable patterns and show symptoms days—sometimes weeks—before a complete breakdown. Catching those signs early is the difference between a routine repair and a costly emergency replacement.
This guide covers the most common walk-in freezer problems, how to diagnose them systematically, which fixes you can safely handle in-house, and when to stop troubleshooting and call a certified refrigeration technician.
Key Takeaways
- Temperature fluctuations, ice buildup, compressor issues, and door seal failures are the most common walk-in freezer problems
- Most failures trace back to deferred maintenance rather than sudden equipment breakdown
- DIY-safe fixes include cleaning coils, replacing door gaskets, and clearing drain blockages
- Refrigerant leaks, compressor failure, and electrical faults require EPA-certified technicians
- Early diagnosis costs far less than emergency repairs — and protects your inventory in the process
Common Walk-In Freezer Problems (and What Causes Them)
Walk-in freezer problems rarely appear without warning. According to industry data, evaporator coil ice-up accounts for approximately 35% of cold storage temperature excursions, while dirty condenser coils cause roughly 25% of compressor failures. Recognizing the early signs means the difference between a scheduled repair and an emergency shutdown.
Temperature Not Staying Cold Enough
Symptoms:
- Interior temperature rising above the standard -10°F to 0°F target range
- Products softening or showing freezer burn
- Compressor running constantly without reaching target temperature
Likely causes:
- Dirty condenser coils restrict heat rejection—fouling acts as insulation, forcing the compressor to work harder and run longer
- Low refrigerant charge from a slow leak, reducing overall cooling capacity
- A failing compressor that can't build adequate pressure to maintain cooling
- Frequent door openings that overwhelm the system's ability to hold temperature
Excessive Ice or Frost Buildup on the Evaporator Coil
Symptoms:
- Visible ice accumulating beyond normal frost patterns
- Reduced airflow from evaporator fans
- Unit struggling to maintain temperature after defrost cycles
Likely causes:
- Defrost system failure—a faulty timer, heater, or thermostat that isn't triggering proper defrost cycles
- Faulty door gaskets letting warm, humid air into the unit
- Low refrigerant causing the coil to run too cold, freeze solid, and choke off airflow
Water Leaks or Pooling on the Floor
Symptoms:
- Water or ice puddles near the unit base or inside the freezer
- Drain pan overflowing
- Standing water that doesn't drain properly
Likely causes:
- A clogged or frozen drain line preventing meltwater from escaping during defrost cycles
- A failed drain line heater allowing ice to block the drain—common in walk-in freezers specifically
- Improper drain slope from installation that prevents gravity drainage
Unusual Noises from the Unit
Symptoms:
- Banging, rattling, humming, or clicking sounds from condensing unit or evaporator section
- Noises that worsen over time or occur at startup
Likely causes:
- Loose or failing fan motor bearings in the evaporator or condenser fans
- A compressor struggling to start, often signaled by clicking from a faulty start relay
- Refrigerant slugging through the system from an overcharge or liquid floodback
Door Seal and Gasket Failures
Symptoms:
- Visible gaps or tears in door gaskets
- Condensation or frost forming around the door frame
- Unit running longer than usual to maintain temperature
Likely causes:
- Normal wear and tear on gaskets from daily use
- Door hinge misalignment preventing full closure
- Heavy traffic keeping doors open longer than necessary, increasing the latent heat load and forcing the compressor to run excessively
How to Troubleshoot Your Walk-In Freezer: A Step-by-Step Approach
Attempting to fix a walk-in freezer without confirming the root cause leads to wasted parts, repeat failures, and potentially voided warranties. Start with observation, not parts.
Step 1: Observe and Document the Symptoms
- Document interior temperature and compare to the target range (typically -10°F to 0°F per FDA guidelines)
- Note compressor status — running continuously, short-cycling, or not starting?
- Check fan operation — are evaporator and condenser fans spinning?
- Look for visible ice on coils or frost around door frames
- Note when the problem started and any coinciding events (power outage, heavy door use, recent cleaning)
Step 2: Check the Obvious Culprits First
Door gaskets and seals: Inspect for gaps, tears, or compression damage. A quick paper test confirms seal integrity — close the door on a sheet of paper; if it slides out without resistance, the seal is failing.
Condenser coils and drain line: Check for visible dirt or grease buildup blocking airflow. Inspect the drain pan and drain line for standing water, ice, or blockage.
Defrost cycle: Confirm the defrost timer or control board is initiating cycles at appropriate intervals. A unit that hasn't defrosted properly in 24+ hours will show heavy coil icing.
Step 3: Narrow Down the Problem Category
Determine which category the fault falls into before touching any parts:
- Mechanical — worn fan motor, failed compressor, bearing failure
- Refrigerant — low charge, restriction in the circuit, active leak
- Electrical — faulty defrost heater, bad thermostat, wiring issue
- Operational — door habits, overloading, product blocking airflow
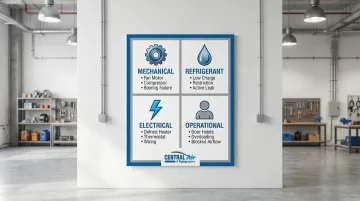
Swapping a defrost timer on a unit with a refrigerant leak won't fix the temperature problem. Confirm the category first.
Step 4: Apply Fixes Within Safe DIY Scope, Then Stop
Safe DIY actions include:
- Replacing door gaskets with manufacturer-approved parts
- Cleaning condenser and evaporator coils (power off first, brush/vacuum, rinse)
- Clearing visible drain blockages with compressed air or a drain snake
- Replacing a defrost timer (if comfortable with basic electrical work)
- Adjusting thermostat or defrost settings per manufacturer specifications
Call a licensed technician when the repair involves:
- Refrigerant — adding charge, locating and sealing leaks
- Compressor diagnosis or replacement
- Electrical wiring beyond simple component swaps
- Any situation where the root cause remains unclear after basic checks
When to Call a Technician—and When You Don't Have To
A common mistake is waiting too long to call a professional out of concern for repair costs. Most refrigerant, compressor, and electrical issues worsen with time—and a failing walk-in freezer can cost hundreds to thousands in lost product within hours. Emergency repairs typically cost 2 to 3 times more than scheduled service due to overtime and expedited parts.
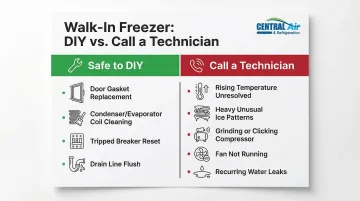
DIY-Safe Situations
These issues can typically be addressed in-house with basic tools and guidance:
- Torn or compressed door gaskets—replacement kits are widely available
- Dirty condenser or evaporator coils—follow proper cleaning procedure (power off, brush/vacuum, rinse)
- Tripped circuit breaker or blown fuse—reset breaker or replace fuse if appropriate
- Simple drain line flush—use compressed air or drain snake to clear visible blockages
Call a Technician Immediately If You Notice
- Rising temperature that doesn't recover after basic checks
- Heavy or unusual ice patterns on evaporator coil—ice extending to suction lines or compressor area signals a refrigerant issue
- Grinding or clicking noises from the compressor
- Condenser or evaporator fan not running
- Water leaks that reappear after clearing the drain
EPA Certification Requirements
Refrigerant work legally requires an EPA Section 608 certified technician—this is not optional. Improper refrigerant handling causes environmental harm, equipment damage, and violates federal law. The sale of refrigerants is restricted to certified technicians.
Walk-In Freezer Repair in Bryan, TX
That EPA requirement is exactly why choosing a certified local technician matters. Central Air & Refrigeration has served Bryan, TX businesses for over 10 years with EPA-compliant refrigerant handling and transparent pricing. Services cover compressor repairs, refrigerant leak detection and repair, evaporator and condenser coil repairs, electrical troubleshooting, and fan motor replacement. Call (979) 324-6791 to schedule service or get a same-day response when your freezer can't wait.
Should You Repair or Replace Your Walk-In Freezer?
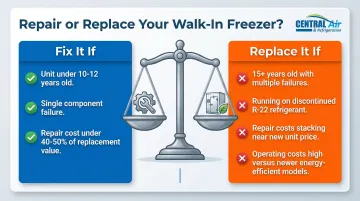
Walk-in freezer repairs can range from a $150 door gasket swap to a $4,000+ condensing unit replacement. Before committing either way, weigh the unit's age, the repair cost against replacement value, and whether parts are still available for your system.
Fix It If
- The unit is under 10-12 years old, well within the typical condensing unit lifespan of 10-15 years
- Only one component needs attention: a fan motor, door gasket, defrost heater, or drain line heater
- Repair cost stays below 40-50% of replacement cost — industry professionals call this the "50% rule"
Replace It If
- The unit is 15+ years old and showing multiple simultaneous failures
- Your system runs on R-22, which ended production in 2020, making recharge extremely expensive at $200-$600 per pound
- Repair costs are stacking up close to the price of a new condensing unit or full system
- Operating costs are high — newer units typically use 20-40% less energy, which adds up fast in commercial settings
Partial Replacement Options
Replacing just the condensing unit or evaporator rather than the entire walk-in structure can extend useful life at a fraction of full replacement cost. Insulated panels typically last 25-40+ years, making targeted component replacement often more economical than complete system replacement.
Preventive Maintenance: How to Avoid the Next Breakdown
Consistent maintenance directly reduces repair frequency, extends equipment life, and minimizes emergency calls. Proper preventive maintenance can reduce overall maintenance costs by 25-30%, decrease equipment downtime by 35-40%, and extend equipment lifespan by up to 10%. A well-maintained walk-in freezer can last 15+ years.
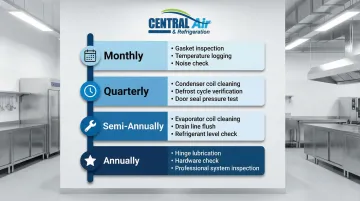
Core Maintenance Tasks
Monthly:
- Visual inspection of door gaskets, hinges, and drain pan
- Temperature logging to catch drift before it becomes failure
- Listen for unusual noises indicating developing problems
Quarterly:
- Condenser coil cleaning to maintain heat rejection efficiency
- Verify defrost cycle frequency and duration match usage patterns
- Test door seal pressure to confirm gaskets are forming a tight closure
Semi-Annually:
- Evaporator coil inspection and cleaning
- Drain line flush to prevent blockages
- Check refrigerant levels and inspect lines for signs of leaks
Annually:
- Lubricate door hinges and latches
- Check all hardware and fasteners for tightness
- Professional system inspection
Professional Preventive Maintenance Plans
Some tasks on that list — coil cleaning, refrigerant checks, and full system inspections — require a certified technician to do properly and safely.
Central Air & Refrigeration offers preventive maintenance plans for commercial refrigeration equipment in Bryan, TX, covering scheduled inspections, coil cleaning, drain line maintenance, and system optimization. A maintenance agreement typically costs a fraction of a single emergency service call, and it protects the inventory inside your unit. Contact them at (979) 324-6791 to discuss customized maintenance scheduling for your operation.
Frequently Asked Questions
What are the most common issues with walk-in freezers?
The top recurring problems include temperature not holding target range, excessive ice buildup on evaporator coils, clogged drain lines causing water leaks, door gasket failures allowing air infiltration, and compressor or fan motor issues. Most stem from deferred maintenance rather than sudden equipment failure.
Why is the temperature going up in my walk-in freezer?
The most common causes are dirty condenser coils, a refrigerant leak, defrost cycle failures causing coil icing, or a damaged door seal letting in warm air. If temperatures rise above 40°F for more than 2 hours, discard affected food per USDA guidelines and call a technician.
Why does my walk-in freezer keep icing up?
Excessive ice buildup is almost always a defrost system failure (bad heater, timer, or thermostat), a refrigerant issue causing the coil to run too cold, or humid air entering through a damaged door gasket. Each of these causes ice to accumulate faster than the defrost cycle can clear it.
How do I tell if my freezer compressor is bad?
Warning signs include continuous operation without reaching target temperature, clicking or grinding noises at startup, excessive heat at the compressor housing, or repeated breaker trips. Confirm diagnosis with a technician using pressure gauges and amp draw testing before committing to replacement.
How much does it cost to replace a freezer compressor?
Commercial walk-in freezer compressor replacement typically costs $1,500 to $5,000, depending on compressor size, refrigerant type, and labor. Get a professional diagnostic first — replacing the entire condensing unit is sometimes more cost-effective than a compressor-only swap.
Is it worth fixing a broken freezer?
Repairs are typically worth it for units under 12-15 years old with isolated component failures. If repair cost exceeds 40-50% of replacement value, or multiple systems are failing at once, replacement usually makes more financial sense.